

Who doesn’t want to put their beer in an old farm gas can right??
I have kind of a large family, and one of my uncles owned a farm for a number of years, he didn’t do any farming but loved living in the area about an hour or so north of Milwaukee, WI. Well a few years back he decided to sell it because he moved his business to Illinois and just was not getting back to the farm very often. He enlisted my brother to help him clean up and move some of his things one weekend.
This same uncle had seen some of the home made projects I had done around the house and in particular a project/gift I had done for my brother so he knew I was into old farm stuff. So in the process of the weekend I kept getting text messages from my brother with pictures of things asking if I wanted them. Some of the old stuff on that farm was really cool, but I just didn’t have room for all of it at my house so I had to have a little restraint. In the end my brother drove his pickup truck home with a load of all kinds of junk, a large portion of it was for me.
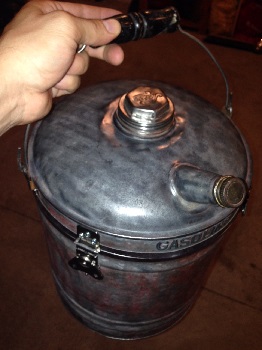
One of those pieces was this old farm gasoline can, pretty beat up & dirty. The darn thing sat around in my storage attic for quite a while because I just didn’t know what to do with it. One day while brainstorming gift ideas for my brothers birthday I had this crazy idea to turn that gas can into a cooler for him. Well it didn’t take long before I was obsessed with making this happen, and I only had a few months time to get it done.
I had several problems to solve:
- It needed to open, close, and latch so that it could be carried around with beer inside.
- It was already a little rusty, even though it was galvanized metal. It needed to withstand water/condensation from the cold beer and ice on a hot day.
- It needed to be somewhat easy to get beer/ice in and out of it.
- I couldn’t have sharp metal edges.
**I built this a few years back so the instructions are from memory and I don’t have pics of the whole process.
First things first, I took to cleaning the outside by using my electric bench grinder (similar one) using a 4″ polishing wheel I was able to clean up the rough spots, dirt, and paint chips. It worked nicely too because it didn’t remove much of the red paint and managed to shine up the exposed metal very nicely giving the can a great shiny finished look.
The next step was to cut the top of it off so that it could be reused as a lid. I used a 3 in. Heavy Duty Electric Cut-Off Tool to cut around a line I drew circling the entire container. (I enlisted help of a friend at this point, and we drank some beer afterwards)
Now I had access to the inside and could for the first time see what I was really up against, I mean this thing had gas in it for how many years? It actually was not that bad inside, a little surface rust was the extent of it. I did a little sanding on the inside in preparation for a paint job that was soon to come. Looking back I should have used a small wire wheel on my hand drill to really clean it up inside. (like this)
With the inside ready to paint I used the black Rust-Oleum Leak Seal spray in a can to get the color I wanted along with sealing the metal from the condensation I would expect to happen later when the galvanized pail is inserted with ice cold beer. I painted everything inside, and masked the outside with paper so I wouldn’t accidently paint the outer walls.
The lid fitting and securing was really the most challenging part of this project. I never did something like this before so it wasn’t like I had a known set of instructions to work off of. Originally I did some things out of order. The best first step is to cut and install the laminate floor edging material around the two edges where the gas can was cut. (I picked some up at local Menards home store) By doing this first before the back hinge it makes sure the hinge and cooler latches are in the right spots to give a good strong and tight fit when installed. I used some epoxy to glue the edging material on.
Use the channel type

I had bought a small hinge for the project but I knew I would need a little clearance to get the lid to fit right so I built up a couple of small cedar wood spacers to mount the hinge to, and then I mounted those to the can. You can see the wood painted gray in the picture below.

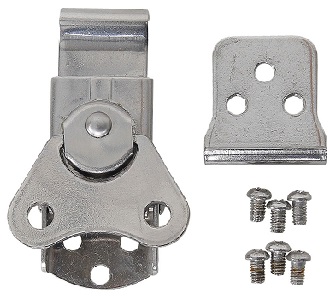
Once I determined that the lid was closing properly and fitting squarely on top of the bottom Can it was time to mount the two cooler clips that I bought (I got mine from NRS, but can’t find the exact units there anymore, however Amazon has this very similar one). Because they are the type that twist to lock I set them up to give me a little downforce to pull the lid tight. This way it won’t have any slop in it when carrying the whole cooler around.
The final step is getting a galvanized bucket that fits inside and allows the lid to close all the way. I took some measurements and found a bucket online that was sized to give me an inch or so clearance at the top and about an inch or so in circumference so that it wouldn’t rub on the sides as I lowered it inside the gas gas. This extra space on the side also allowed for the bucket’s handle to have a place to go.
Finished project video, showing it off to the friend that helped me. By the way we drank those beers after the video.
Download video here Beer Cooler Video
Total price in parts was about 60 dollars or so if bought from the Amazon product links, but I got the gas can for free. So it isn’t the cheapest cooler in the world, but I can say for sure that when this article was first published, I am sure mine was the only one like it in the world.
Hopefully sharing this some of you out there will take on the challenge and there will be a few more gas can coolers roaming around with tasty cold beverages inside.
Bold items are links to Amazon products, I like using Amazon because I can get most if not all of my parts in one order right to my door.
**I do receive a small commision if you purchase from my links.
